Tag Archives: fun

Zebra cupcake stand

13 Apr

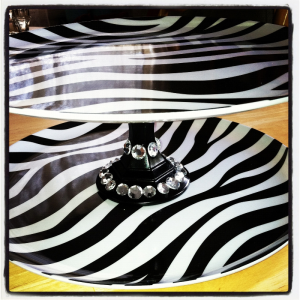
Here is an easy tutorial on how to make your own two tier treat stand! This particular stand
works great for cupcakes, cake pops, cookies, brownies, candy bark, and lots
more!
zebra1

These are the things you will need

zebra3

– Candle stick holder, found at the dollar store- Spray paint, made for glass. I chose the color black because it matches my plates – E-6000 glue – Rhinestones – 2 Plates, I found these zebra ones at a 99 cent store

1. First paint your candle stick holder, it may take a few coats to cover it completely 2. Once your candle stick holder is painted and dry you can start to apply rhinestones using your E-600 3. After your rhinestones have dried, apply glue to the bottom of the candle stick holder and in center on top of one of your plates (this will be the bottom tier) let sit for 2 minutes and then press the plate and candle stick together, allow to dry for several hours. 4. Apply glue to the top of the candle stick holder and in the center underneath your second place (this will be your top tier), let sit for 2 minutes, press together and allow to dry for several hours or over night.Now go bake some treats and put your new dessert stand to work :)*For best results follow the gluing directions provided on your E-600 glue.

Turtle cupcakes

5 Apr

Turtle2

Back in April of 2011 I made these cupcakes for a class potluck and everyone loved them. Eventually I uploaded a photo on Pinterest, over time the amount of re-pins has gone wild so I’ve now decided to make them again and in doing so share my method for designing and assembling them. These guys are really fun and simple to make which allows kids to help out in the process!

These are the items you will need

Turtle1

1. Cake mix of your choice (Store bought or homemade)
2. Frosting of your
choice
1. Giant jelly beans. I found these in the Easter bulk section at
Winco.
2. Regular sized jelly beans in various shades of green. The dark
green is watermelon, the middle shade is apple, and the light green is juicy
pear. I especially love the pear flavor for this project because its color is
light green with darker green and brown speckles which gives a nice look for the
turtle’s shell.
3. For the eyes I used white confetti sprinkles and my
Americolor pen to draw on the pupils.

Directions

  1. Prepare your mix
  2. Fill cupcake liners a little over half full (this will allow your cupcake to rise and give the look of a shell)
  3. Bake and allow to cool
  4. Frost your cupcake
  5. Use kitchen scissors to cut a giant jelly bean in half
  6. Apply a small amount of frosting to the cut side of the jelly bean and attach it to your cupcake (this is your turtle’s head)
  7. Apply shades of green jelly beans around your “shell” in any pattern (Every turtle is different!) I found it helpful to start at the bottom and work my way up
  8. For the eyes I used a skewer to add a small amount of frosting to the back of the eyes and then placed them on the turtle’s head.

*When I first made these I used a green “dot” candy as the head so if your local
store doesn’t carry the giant jelly beans a green dot or gumdrop would work too!

I hope everyone enjoys these little guys! 🙂

turtle3